


You guys…. I FINALLY get to share this amazing farmhouse table with you all!
If you know me, you know I have been hassling my husband about building me a huge table for probably 3 years now. He must have gotten sick of listening to my “reasonings” as to why we NEEDED this table 😉 There is nothing better than having a big cozy spot to sit at and enjoy conversation with family & friends. As you know by now, I’m a little bit of a Pinterest stalker. I have been going through all the farmhouse dining table feed trying to decide exactly what I wanted and envisioned in our dining space. I narrowed it down to a couple great options but I chose this one because of the hefty legs and metal brace. I just thought it was really unique and special! I also had always envisioned having a bench on one side, simple chairs on the other, and two big cozy chairs on the ends. I will get to all of that after the step by step building plans.
For this exact table we really didn’t follow any official plans. I found this picture on Pinterest and was feeling drawn to this look yet still wanted to make it our own. This picture is actually advertising one of the clear chairs so unfortunately the table is not for purchase, nor can you find plans for it anywhere! Our bench can be found through my favorite Shanty 2 Chic gals. We didn’t intend to use these exact plans, but with how long it ended up being we needed the extra third X brace to support the weight of the wood. Plans for the bench can be found here.
Are you guys ready to dive on in? I have my trusty handyman sitting right next to me so you get the full run through.
Table Size: 87″ length x 40″ Width x 30″ height
Table top: 2 x 10 x 8 are cut to 77″ long
Both 2 x 6 x 8 end caps are 5″ long to get the total length of 87″
Materials needed:
- Table saw
- Miter saw
- Circular saw
- Kreg Jig
- Biscuit Joiner
- Drill
- Orbital or belt sander
- Counter sink drill bits
- Wood filler
- Wood glue
- Clamps (Minimum 6)
Lumber & Fasteners:
- 4.5″ wood screws for the base (16)
- 2.5″ wood screws
- 2.5″ pocket screws for table top
- 2″x 10″x 8′ for table top (5)
- 2″ x 6″ x 12′ for table top end caps and feet (1)
- 4″ x 4″ x 8′ for legs and X braces (3)
- 1″ x 48″ black conduit
- 1″ iron floor flange (2)
Cut List
- Cut all five of your 2” x 10 ” boards to 78″ long
- Note: We will cut the boards down to their final length of 77″ with a circular saw and guide once they are all joined. This will allow for a perfectly square and flush edge across all boards. If you are confident in your ability to cut 5 boards perfectly the same length and seamlessly join them then feel free to cut them to 77″ right off the bat.
- The type of stud lumber we are using has rounded edges. We want them to be square so that they are nice and flush once joined for the table top. We also want to leave the rounded edge on the two outboard pieces. It is also extremely important to take your time selecting these boards from the store. If they are bowed or twisted they will not join up well and you will have a warped table top. We were able to find some really nice straight boards but if you have warped boards you will need to run them through a thickness planer and jointer to get them square.
- For the middle 3 boards set your table saw to take off 5/8″ and run the boards through on both edges. This will take off 1.25″ total and leave you with a board that is 8″ wide. 2″ x 10″ boards are nominally 1.5″ by 9.25″ to begin with.
- For the 2 edge boards set your table saw to take off 1.25″ and only run them through on one edge.
- Cut your 2″ x 6″ board into two 40.25″ pieces for the end caps. The reason these are cut slightly wider than the table width is to allow for sanding the squared edges down once joined to the table top. Save the rest of this board as you will need it for the feet.
- Set your table saw to take off 1/2″ and run the 40 pieces through on one edge only.
- Cut 4 pieces of 4″ x 6 ” with a 45 degree bevel to 12″ on the long side
- Cut 2 pieces of 4″ x 4″ to 20 inches for the vertical supports
- Cut 8 pieces of 4″ x 4″ with a 45 degree miter on both sides to a length of 14 inches on the long side for the “X” braces
- Cut 2 pieces of 4″ x 4″ to 36 inches for the top horizontal support
- Cut 2 pieces of 4″ x 6″ to 36″ for the bottom base supports
- To round off the edges on the 4″ x 4″ and 4″ x 6″ there are a couple of options.
- Option #1: If you have a band saw or access to one this would be the best option. Make a stencil to round off the edge into a profile you like and copy it across all the boards then cut it with your band saw.
- Option #2: Mark off a few points that approximate the curve you want. Make 3 cuts with your miter saw, one at 30 degrees, one at 45 degrees, and one at 60 degrees. Then use your orbital sander to smooth it out starting with a coarse grit and moving to a finer grit to finish. This is what I did for the 4″ by 4″ and it turned out really nice. My miter saw wasn’t big enough to do this for 4″ x 6″ so I used a reciprocating saw. It was very difficult and definitely didn’t turn out as nice as the 4″ x 4″ pieces. But hey it is a rustic table so a little imperfection here is ok.
- To round off the edges on the 4″ x 4″ and 4″ x 6″ there are a couple of options.


Plans
Now that all the cuts have been made it’s time to start putting things together. We’ll start with the table top. Arrange your boards side to side according to how you want the final product to look. You can swap the middle boards around if you don’t like the way the different grains look next to each other. Once they are all lined up to your liking push them together on a flat surface and mark 4 spots along the seams between all of the adjoining boards. I marked mine at 4″, 27″, 50″, and 73″. These will be the locations for our biscuits. Set your biscuit joiner depth to 3/4″ so the biscuits are sitting dead center on the board and cut your biscuit holes at these locations. The biscuits will not add much structural support but are really there to ensure that the boards sit flush with each other.
Next, drill pocket holes in the bottom of the boards to assist in joining them. Set your Kreg Jig for 1.5 inches thick. I used 3 pocket holes per board (One close to each end and one in the middle) but over to you if you want to add a few more. These will give added strength and really help to ensure a snug fit between your boards. It’s easy to get confused with which way you should be drilling when you are flipping boards over one at a time so take your time here.
You are now ready to join the table top together. Place your boards on a flat surface with the top facing down so that you will have access to the pocket holes. Place biscuits in all of your holes. One at a time apply a bead of wood glue on the edge between two boards and press them together. If you are having trouble getting them to seat fully use a rubber mallet or a hammer and a piece of scrap wood to help apply the necessary force. Use 2.5″ pocket screws to cinch down the joint, first making sure that you are lining up the edges of the boards to the best of your ability. If it’s a little bit off that’s ok we’re going to cut a bit off to square it up after everything is together. Do this all the way across until all of your boards are together. Add clamps across the width of the table top to secure everything. The more clamps the better but i would recommend at least 6. They are about 15 dollars a piece even if you get the economy brand. Here is a link for some decent ones, http://www.harborfreight.com/48-in-aluminum-bar-clamp-60540.html. You want your clamps to be snug but not so much that they cause your table to bow. If you don’t want to spring for the clamps you will be just fine as long as you add more pocket screws. If this is the case for you I would recommend a pocket screw every foot along the length of each joint. Follow the instructions on your wood glue for how long it needs to cure before the bond is secure. I used Elmer’s Max wood glue and waited about 8 hours before i handled it and it held up just fine.
Once the glue is dry it’s time to trim the edges so that everything is square. I had some minor differences, probably about 1/16″, where one board was sticking out further than the other. This will cause your end caps to not mount properly and there will be a gap. To remedy this you just need to take a little off each end with a circular saw. Do not draw a line and try to follow it because you will not be able to saw perfectly straight across the length. You want to use a guide here. Use your pencil to mark 1/2″ on the end board. Set up your guide so that your saw blade will cut at the right location. You can buy a guide or use something you already have in your garage. I used a 4′ aluminum level but really any straight object that you can clamp down will work. This video has some great examples. https://www.thisoldhouse.com/how-to/how-to-make-circular-saw-guide. Take a half-inch off both ends and you should be left with a seamless table top that is now exactly 77″ long. If you have some larger imperfections you may have to take a little less material off in order to get you table top to 77 inches finished. Mine ended up at about 76.5.
Next attach the end caps by using the same process of biscuits and pocket screws. I used 3 biscuits and 5 pocket screws on each end cap for added strength. The exact locations on the biscuits isn’t extremely important as long as you have one near each end and one near the middle. Once you have the end caps attached and drying you can move on to the legs.
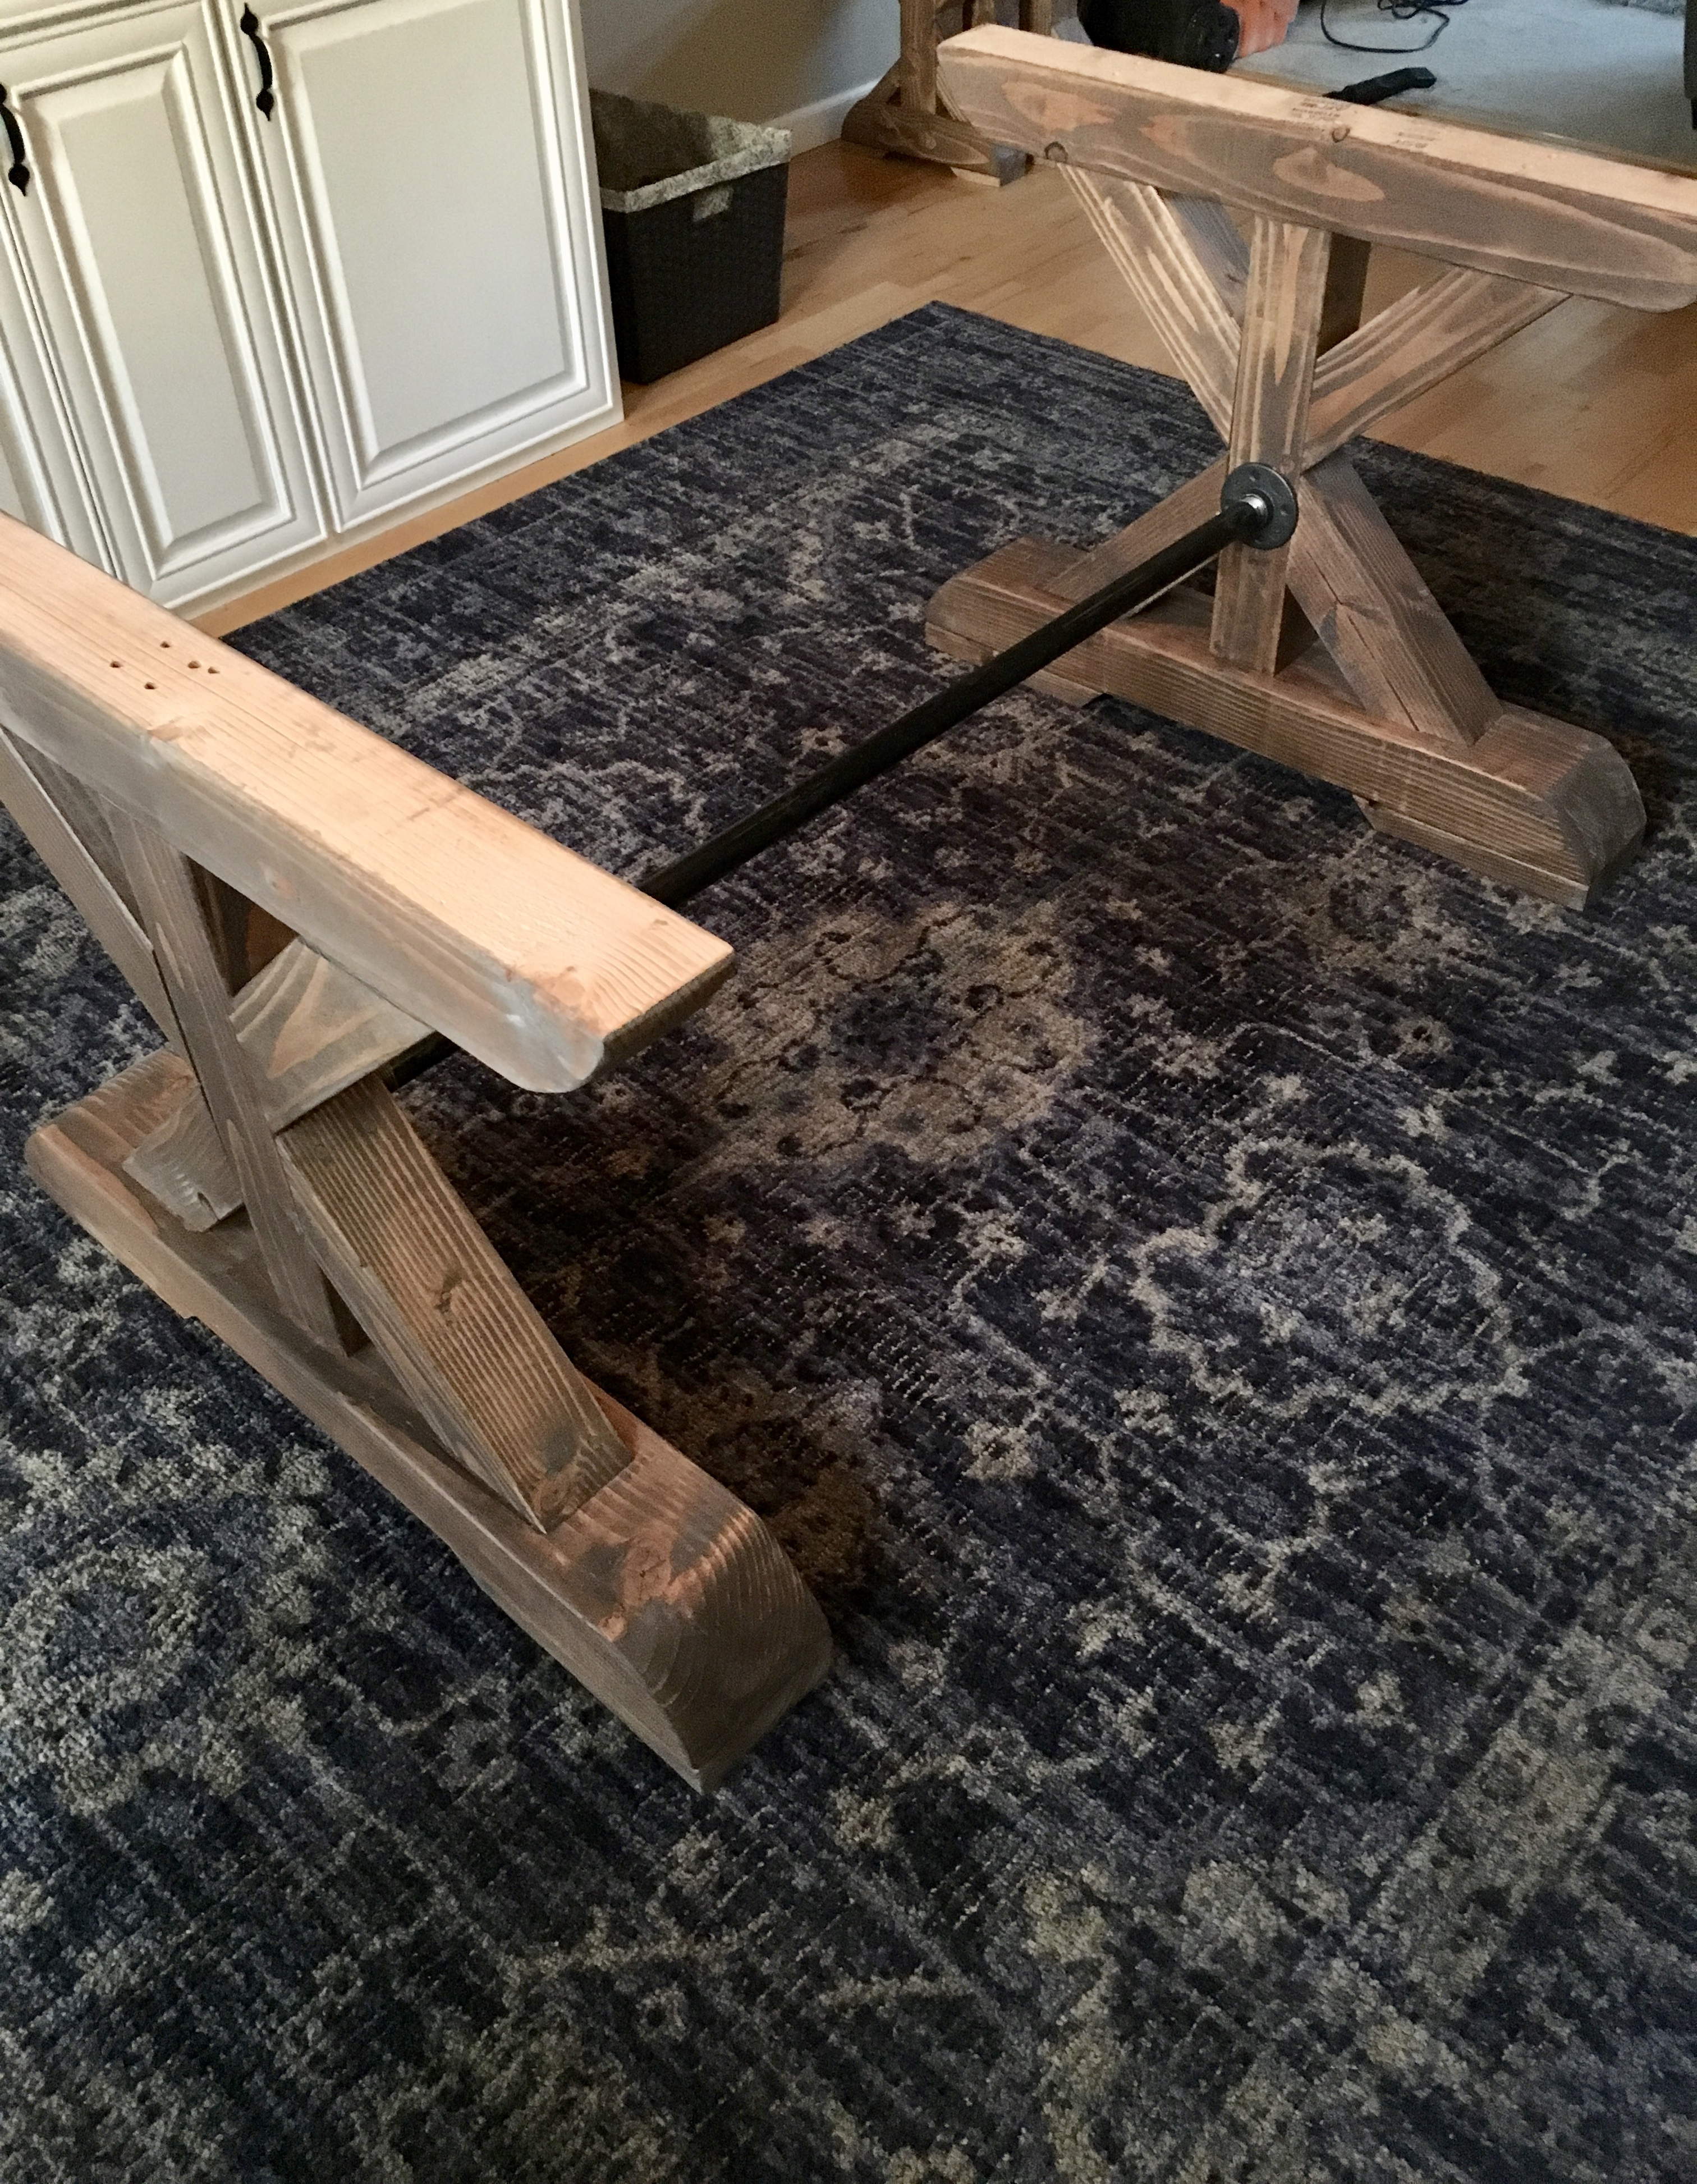
Begin by first attaching the top horizontal 4″x4″ to the vertical 4″x4″. Mark the center of the horizontal 4″x4″ and drill 4 countersink pilot holes. Add wood glue to the end of the vertical support and use 4.5″ wood screws to screw through the horizontal 4″x4″ and into the end of the vertical support. Use clamps to ensure that the boards don’t shift as you are securing them. You should now have a piece that looks a “T”. Flip the piece over and use the same procedure to secure the 4″x6″ bottom horizontal piece to the vertical 4″x4″. Make sure that your 4″x4″ is sitting dead center on your 4″x6″. There should be a one inch overhang on each side. Once the 4″x6″ piece is secure use countersink pilot holes, glue, and 2.5″ wood screws to secure the feet to the bottom of the 4″x6″ base. Next attach the X-braces with 2 countersink holes, glue, and 2.5″ wood screws at each joint. After all the X-braces are in place you are done and ready to start the finishing process.
Fill all the holes in the X-braces with wood filler. Overfill slightly to allow for sanding. Let dry for 24 hours before sanding. If you would like, add pocket hole plugs and wood filler to the bottom of your table top…or don’t, no one is ever going to look under your table anyway. I added plugs only because it was easy and did not worry about the bottom of the table looking perfect. Sand the entire project using your orbital sander starting with a coarse grit for major imperfections. I began with 80, went up to 150, and finished with 220 on the table top only. If you have some very large imperfections that need to be leveled out you can use something coarser like a 40 grit but it will really tear up the wood. Just make sure you leave enough excess to hit it with finer grits as you get it close to where it needs to be.


Stain
- Minwax Wood Conditioner (don’t skip this step, it makes a difference!)
- One coat of Minwax Weathered Oak
- One coat of Minwax Special Walnut
- 3 coats of Varathane Polyurethane, Matte Soft Touch
- Lambs Wool Applicator for smooth & easy stain (this was a tip from Shanty 2 Chic gals, and it worked like a charm, I will 100% be doing this every time in the future)
- Microfiber towel or painters rag to wipe off any excess stain the lambs wool may have left
- Small brush to get in cracks of the X Brace legs, OR use a microfiber towel, or painters rag to get in small hard to reach places
- High quality synthetic paint brush for sealant
- Respirator, we have this one. I had to use this right now being pregnant but I really do recommend it in general, with the amount of time it takes to stain and all the chemicals you’re inhaling in that span of time I think it’s a safe way to go!
The Process:
Start by applying the wood conditioner with a microfiber towel according to the instructions on the can. It’s pretty simple and will go on quickly. The wood conditioner will make your final product look so much better and less blotchy so don’t skip it.
Apply your first coat of weathered oak with your lambswool applicator to the bottom of the table and the legs. You may need a brush to get into some of the hard to reach places on the legs. Let it sit on the surface for 5-10 minutes then lightly wipe off excess with a tack cloth. Now you just need to let it dry. Drying time will vary based on temperature and humidity but could take awhile. We did that first coat in the morning around 8AM, then came back at 4PM and did the special walnut coat on the bottom of the table only.
The next morning come back out and flip the table top over. You can now do the first coat of weathered oak on it. You will get a better result if you wait for it to fully dry before resting the stained portion on anything but we weren’t too worried about the bottom of the table being absolutely perfect. That afternoon we applied the special walnut to the table top and the legs. Take it slow with the special walnut. It is a very dark stain so don’t let it rest on the surface for too long. You can always off another coat if you want it darker but it would be a real pain to sand it all off.
Now the hard part. Wait anywhere from 24-48 hours for the stain to fully and thoroughly dry before applying the polyurethane. You don’t want to seal water into your wood so be patient here.
Once everything is dry apply your first coat of polyurethane. When applying the polyurethane use smooth brush strokes with the grain. It will probably take a quite a bit on the first coat as the wood absorbs it. Don’t worry about being able to see small brush strokes as the urethane will self level as it dries. It will go on with a milky appearance but dry clear. Wait 2 hours and apply a second coat, no sanding required. This coat should go on much easier. Never apply more than 2 coats in a day. Wait 24 hours. You’ll want to lightly sand with a very fine grit sandpaper before the final coat, something 220 or up. Wipe with a dry cloth to remove the dust and apply your 3rd coat. We did not apply any polyurethane to the bottom of the tabletop. Now you just have to let it dry and cure up.
The can says to wait 7 days for it to fully cure… we waited 3 days after the last coat of sealant before bringing it inside to assemble, it’s important to make sure it’s fully cured and ready to be used, if you rush this process you could end up with permanent marks on your table from whatever you set on it. You’ll want to bring in the legs, metal brace and table top separate because with the real pine lumber it is HEAVY! It also wouldn’t have fit through our doorway assembled.


Final Assembly:
This is going to take 2 people, but 3 would make it easier. Set up your two legs spaced at approximately the correct distance apart. Screw the floor flanges onto the conduit before attaching to the supports. We centered ours up where the bottom X supports meet the vertical support. Screw it into the vertical support with 2.5″ wood screws. Put a level on it and adjust the other leg so that it sits flush against it and attach to the second leg. You should now have a secure base to place the table top on.
Drill 4 countersink pilot holes through the horizontal 4 x 4 up towards the table top, one on each corner of where the table will be attached. If you want to use more than 4 go for it, but ours is holding up great. Set the table top on your base. Take measurements of the overhang on both ends. It should be equal. If it is you know it is centered up end to end. Also measure the overhang on the sides of the horizontal supports. Once you have equal measurements on these 4 points you know it is centered up side to side. Secure the table top with 4″ wood screws.
Tips:
Take your time selecting lumber. Boards with bows and twists will make this project very hard.
Stain bottom of table top first so that it never rests on the finished top edge, this is important!!!
All instructions are on back of stain/sealant cans, we always follow these. Staining is a long process that requires lots of patience and waiting time but its worth it! Take this from a girl who likes to see projects done immediately upon seeing them on Pinterest 😉
Decor:
Tufted fabric end chairs found at Wayfair
Bronze metal chairs found on Amazon
Ivory ceramic lanterns found at Crate & Barrel, old, but similar ones found here, here & here
Rug found on sale at Target
If there’s anything you think we missed in these plans please send me a message and we will try to help you out! You guys can follow my inspiration on Pinterest by clicking on the “Follow Me” link on the right hand side of my blog.